Optimize shaft surface finish for maximum seal performance
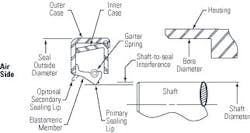
Contacting radial lip seals are used in a range of mechanical power transmission equipment. Seals extend the service life and efficiency of motors, gear drives and other devices by retaining lubrication and excluding contamination. Whether fabricated from rubber or plastic, they depend on precisely machined shaft surfaces to establish and maintain a controlled oil film that is approximately 0.00001 inches (0.25 microns) thick.
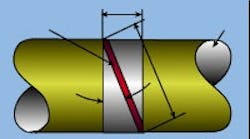
Shaft lead angle plays a significant role in leakage.
If the shaft surface is too smooth, there can be an absence of "pockets," or asperities, to maintain a lubricant film, resulting in possible lip damage and premature leakage. If it is too rough, metal peaks protrude through the oil film, causing severe wear and short seal life. For many years, the Rubber Manufacturers Association (RMA) published an industry standard recommending shaft surface finishes with a roughness of Ra 10 to 20 microinches (.25 to .50 lm) and less than 0.05 degree of lead angle.
Lead is a well-known leakage factor. It is a spiral groove, created during the initial turning process and, when oriented outside the housing, can create outflow that overcomes the pumping ability of seal to retain oil. The presence of lead can be confirmed by a simple but effective string and weight test using the formula1:
Lead angle = arctan string advance__________
(shaft circumference) * (number of revolutions)
However, engineers and technicians have discovered that leakage sometimes occurs in a variety of applications even when the limits are observed. This indicates that Ra and machine lead alone are insufficient to ensure consistent, leak-free sealing. Consequently, RMA commissioned a task force to determine what other factors contribute to leakage.
Surface roughness
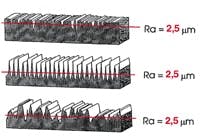
The taskforce found that focusing on the correct roughness parameter alone will not reduce the incidence of seal leakage. For example, Ra does not describe the surface profile, because it is an averaging technique for the micro-surface deviations above and below a mean line in a given assessment length. Therefore, various shafts with the same Ra value may have different profiles and a given seal will react with dissimilar results on each (see Figure 1).
Figure 1. Various shafts with the same Ra value may have different profiles, and a given seal will react with dissimilar results on each.
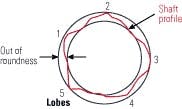
In the early stages of the study, it was also determined other shaft conditions were found to have a negative effect on sealability. For example, out-of-roundness and lobing could result in a dynamic run-out exceeding the ability of a lip to follow the shaft, particularly at high speeds and cold temperatures. Therefore, roundness and lobing (see Figure 2) were added to lead along with grinding chatter in an initial set of recommendations (see Figure 3).
Figure 2. Rounding and lobing also have an impact on sealability.
Figure 3. In addition to shaft lead, these characteristics influenced sealability.
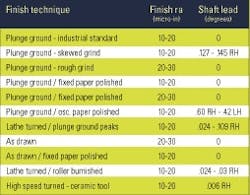
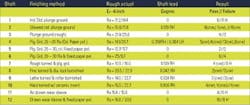
They incorporated a variety of methods used to finish the shaft at the seal contact area, including plunge grinding, paper polishing, “as drawn,” roller / diamond burnishing and ceramic turned with high-speed tool. Twelve variations of the five methods selected for evaluation are in Table 1.
Thirty-six test shafts were fabricated using SAE 1045 steel at 30 Rc hardness. The diameter was 3.000 inches (76 millimeters). Test conditions were:
- 96-hour duration at 2,160 rpm
- Cycle 20 hours on, four hour off
- SAE 30 oil at centerline
- Sump temperature was 66ºC (150ºF)
- Dynamic run-out (DRO) of 0.125 millimeters (.005 inches)
- Shaft to bore misalignment (STBM) 0.25 millimeters (.010 inches)
- Failure criteria: measurable leakage
A total of 94 plain, trimmed lip seals of nitrile (NBR) rubber were then tested with 37 failures (39%) as summarized in Table 2.
Table 2. A total of 94 plain, trimmed lip seals of nitrile (NBR) were tested with 37 failures (39 percent of the total).
In continued testing, 110 more single lip seals of NBR were run but they had a bi-directional hydrodynamic wave pattern at the contact point. Test time ranged from 96 to 1,000 hours. There were no failures. Cumulative test time of the 204 seals was 17,265 hours.
Measurement of shaft surfaces
Modern stylus type surface analysis equipment, using digital processing technology, filtering and computational analysis, is needed to assess different shaft surfaces properly. The stylus must be able to follow the minute surface contours of the metal accurately. As a result, a 90 degree, diamond-tip stylus with a radius of five microinches (0.0002 inches) was used. A M-1 Gaussian filter removes the broad undulating pattern underlying the profile form being analyzed.
The assessment length or cutoff is critical to accurate readings. Instruments may take seven assessment readings from the surface, but ordinarily only the middle five segments are used. Setting the assessment too long can mask the actual surface texture being studied. Furthermore, long reading lengths may be impossible because of shaft geometry. As a result, the previous standard of 0.80 millimeters (0.030 inches) was reduced to 0.25 millimeters (0.010 inches). This presents no problem because the entire contact zone for radial lip seals is generally 0.25 to 0.50 millimeters (0.010 to 0.020 inches).
Surface finish parameters
Several shaft finish parameters characterize a profile. For example, skewness or Rsk is the measure of the symmetry of the surface profile around the mean line. It reveals whether the surface has higher peaks or lower valleys from the mean line.
Extensive laboratory work and iterative testing statistically correlated the various parameters to seal performance. Three related surface parameters were identified.
The arithmetic average or Ra, also known as arithmetic average or center line average, is a useful guide to the general surface roughness. It is the average value of the filtered roughness profile determined from deviations about the center line within the evaluation length. In the new 0.25-millimeter (0.010-inch) cutoff length, there is a 99% linear correlation between Ra and the previous root mean square roughness value.
The average peak to valley height (Rz DIN) is the arithmetic average of the maximum peak-to-valley heights as measured for each of the five consecutive cutoff lengths over the total assessment length. The Rz DIN measure provides a picture of high roughness peaks and the availability of pockets to hold lubricant under the seal lip.
The average peak to mean height (Rpm) is the arithmetic average value of the single highest peaks above the mean line for each of the five consecutive cutoff lengths over the total assessment length. This datum warns against very high roughness peaks. Because the height of such peaks can exceed the lubricant film thickness, operation on surfaces above the maximum value could result in abrasive seal lip wear.
The textural differences between shafts of similar roughness are measureable and relevant to lip seal performance. These parameters form the basis for the current RMA recommendations for shaft finish (see Figure 5). The parametric model demonstrated a high correlation to the analyzed test results for the plain trimmed lip seals. However, the parameters must be achieved simultaneously to ensure optimum shaft seal performance. A more complete development of the study group findings can be found in RMA bulletin OS1-1.
The bottom line
Along with Ra, the additional surface parameters Rz DIN and Rpm provide useful indices that characterize shaft surface texture as it relates to radial lip seal function. They can be assessed using available electronic tracing machines. The parametric model had a 97% correlation accuracy to analyzed shafts.
- Oil Seal Technical Bulletin (OS-1-1), approved 1999, Rubber Manufacturers Association.
- "RMA Shaft Surface Finish Recommendations for Rotary Lip Seals," SAE Paper 1999-01-0886, Sept. 15, 1999, Ron Jackowski, Chicago Rawhide and Ron Lavoie, Hommel America.
- Non-Ra Roughness Parameters of Shaft Surfaces for Radial Lip Seal Applications," SAE paper 951195, Jaijin Qu, Chicago Rawhide.
- Drawings and tables: Chicago Rawhide
Leakage control by any radial lip seal is adversely affected when the shaft has a profile that exceeds recommended limits. Hydrodynamic seals have less sensitivity to both shaft lead and finish. Of the 110 hydrodynamic seals tested, none failed. By comparison, 39% of the plain lip seals failure. However, hydrodynamic seals cannot be considered as substitutes for providing the recommended surface parameters.
Shaft lead has a major role in lubriant leakage and should not be underestimated. Lead angle should be less than 0 + .05. A simple string and weight test will confirm the presence of shaft lead.
Although many shaft finishing methods, including those in the RMA study, are capable of producing surface textures within the recommendations, caution should be observed because they have different benefits and limitations. Some can generate preferential lead. Still others have varying ability to correct for intrinsic lead or major underfinish irregularities. Plunge grinding, using RMA methods, is generally the preferred finishing process.
Glenn E. Gabryel is a senior product manager with Chicago Rawhide. He can reached at (800) 323-8024, ext. 4438 or at [email protected].
