Sophisticated companies know that safety is a journey, not a destination. It is a part of their strategic and ongoing growth. As more and more companies look to implement safety programs, questions about budget, time, effort, and feasibility come into play. Larger companies may already employ a safety engineer or even a safety team, with well-established metrics and objectives each year. If you don’t fall into that category, don’t be discouraged. The most important thing you can do on any journey is to start. To begin your safety journey, you start with a risk assessment.
In the United States, when an accident originates from machinery, the owner of the machine is responsible for safety, not just the manufacturer of the machine. This means that if something happens, it’s technically your responsibility. If that doesn’t scare you, it should.
The beauty of the risk assessment is that it is your education on what could happen with the machinery in your facility. What you choose to do with your newfound knowledge is up to you; however, in the immortal words of G.I. Joe, “Now you know, and knowing is half the battle.”
There are a few caveats. Although companies could self-perform their risk assessments, it isn’t a job that just anyone in your plant can do. A TÜV certification is needed, as well as an understanding of ISO 13849 or IEC 62061 standards. Anyone could pick up the standard and follow the process, but it’s hard to implement a standard and its many details if you’re new to safety. This is where having a safety professional can be very beneficial for efficiency’s sake. He or she can walk into a situation and quickly identify what needs to be done, based on experience and a well-versed understanding of the standards.
- Read "Machine safety simplified"
Whether you’re responsible for starting your facility’s safety journey and will be self-performing these tasks, or just trying to understand what to expect with this process as you look for and work with a safety professional, here is a breakdown for you.
Identify all risks on the machine
This usually starts with a visual inspection of the machine, although we’re performing risk assessments for a client on new machinery that is still in construction. In that case, you’re reviewing mechanical and electrical drawings to identify risks. The mechanical drawings do not yield as many insights as a visual inspection of the actual machinery but are a good starting point. With the electrical design, you can see more. Do they have dual channel safety circuits? Is there a safety PLC or relay used, etc.?
As you identify the risks or hazards associated with the machine, it’s important to categorize the task and hazard categories, as seen in Figure 1. Consider when the hazard could occur just as you categorize the hazard itself. Operation, setup, and maintenance may all include different hazards.
Tony Schalk is a certified functional safety engineer (TÜV Rheinland) and works as an automation systems engineer for E-Technologies Group, a certified member of the Control System Integrators Association. For more, visit the company profile on the Industrial Automation Exchange.
Evaluate each risk for severity, frequency, and possibility of exposure
Now that you’ve identified all your potential risks, you need to measure each one. This will help identify what risks you need to address first and how. For this, we use a measurement called Required Performance Level, or PLr.
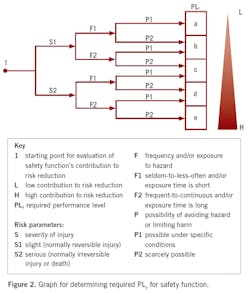
You start with your hazard as a number 1 (see Figure 2). From there, you look at the severity of the injury, shown as S in the PLr chart – is it a reversible injury such as a cut, or irreversible such as an amputation or death? Then frequency, shown as F – is the exposure happening frequently during operation and/or setup, or does it happen only under certain conditions? Finally, you measure the possibility of avoiding the hazard, shown as P – either it’s possible to avoid under certain conditions, or is unavoidable. The flow of values determined for each of these areas of the chart gives you a final PLr rating, scaling from A-E, with A being the lowest risk and E being the highest.
In the case of the dough chunker in Figure 1, we determined that the severity of the hazard is slight or normally reversible, exposure time is short and/or occurs seldom or less often, although it is scarcely possible to avoid the hazard when exposed. This gives us a measurement of PLb.
We use PL levels to show clients what things to prioritize. Some of it requires redesigning the machine or the controls. In those cases, we use a software called SISTEMA, which looks at a machine’s components and gets data from the manufacturers on when and how they fail, generating a PL level.
Decide what to do about your risks
Now you’ve been armed with the power of knowledge about the hazards your operators are exposed to and how severe those hazards are, it’s up to you to decide what to do next. Are you going to eliminate the hazard? Mitigate it? Live with it? Your Required Performance Level Rating will guide your decision, as will your safety professional or integrator. Your integrator can be a valuable resource in helping you determine how best to manage the hazards. It is important that you engage your integrator before looking at hardware or asking a vendor what your facility needs.
The final thought I would leave you with is to start somewhere. Maybe you have a lot of machinery to evaluate and not a lot of spending available. Talk to your safety professional. They will work with you to start an approach that is manageable for you.
For example, a client we’re working with needs to perform risk assessments on its machinery, but there is so much to be evaluated that it would be far too expensive for us to perform all the assessments. So, we proposed a system such that we perform risk assessments on three of the machines, training the client’s designated employees so that they could use the same tactics and self-perform. When the company is ready to work on mitigating the risks with automation and controls, we will help it with this task. By getting started with risk assessments, they’ve already set themselves up for success in safety, and apart from competitors who haven’t taken that crucial first step yet.
This article is part of our monthly Automation Zone column. Read more from our monthly Automation Zone series.


