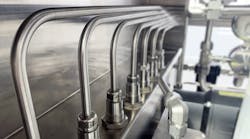
The safety, efficiency, and profitability of plants depend on reliable industrial fluid systems. To keep the systems in peak working order, it is crucial to consider many important factors, including proper tube and fitting installation.
Proper installation from the beginning can help ensure the system is productive over its life span. Improperly installed and poorly chosen tubing and fittings are most frequently the cause of leaks in an industrial fluid system. Leaks can lead to lower profits and poor operational efficiency, as well as putting plant personnel at risk from exposure to potentially toxic gases and fluids.
This article reviews how to select and prepare the right tubing for each installation, how to perform the installation itself, and why proper installation is essential to keeping your workplace safe and secure.
Understanding tubing characteristics
Tubing systems are complex environments that require an understanding of the specific tubing being used before installing a tube fitting connection. For example, tubing comes in a variety of interior diameters, wall thicknesses, surface finishes, and concentricity. This variety, while increasing its useability, makes the decision of which one to use complex.
Tubing system design best practices
System designers should consider the following best practices as they work through their processes:
- Decide how many tube fittings and what length of tubing are necessary to fit the entire system before it is installed. As determinations are made, ensure there is enough tubing available to allow every cut to fit into the fitting bodies.
- Ensure the connections will be accessible for maintenance and inspection throughout the system’s lifetime. No matter the quality of the components, all tube fittings will need to be serviced over time. The more accessible they are, the easier it will be for technicians to service them quickly and efficiently.
- Take other critical systems into account when running your tubing so they are not in conflict. For example, never run tubing in front of critical instrument panels. In addition to making the panels inaccessible, they can also cause unnecessary safety concerns. Do not run tubing at handrail or footrail heights to avoid accidental contact with plant personnel, which could pose safety hazards to the employees.
- Support the tubing correctly when involved in longer runs. Support can reduce system vibration and allow tubing and fittings to last longer and keep the system performing at its peak for the long term.
Tubing preparation
Once the right tubing is selected, it is time to prepare the tubing properly before connections are made. To create ideal tubing conditions:
- Use a tube cutter to cut the proper length of tubing required.
- Position your tubing between rollers and cutting wheel.
- Turn the handle until the wheel touches the tube, then advance the handle an additional one-sixteenth turn.
- Rotate the cutter around the tube.
- After every second rotation, advance the handle an additional one-sixteenth turn.
It is permissible to use a hacksaw when a tube cutter is not available, but that will often mean the cuts will be rougher. No matter what kind of cutter you use, however, there will be burrs on the ends of the tube that must be removed using a deburring tool.
The deburring process should not be skipped because it is essential to preventing leaks and ensuring the fittings work as they should. In addition, burrs may damage components throughout the system if they break off. For example, they can puncture the sides of the tubing with small holes or vents, or they may scratch valve seats or soft seals such as O-rings. Once the tubing is deburred, it is time to proceed to the tube fitting installation.
How to install tube fittings
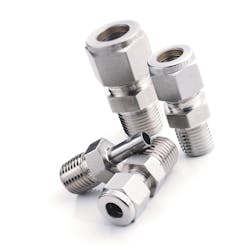
Though there are many options when choosing a fitting, the most robust grip will be created by using a two-ferrule, mechanical grip design. Its hinging-colleting action will create a secure seal for most fluid system applications, as well as providing more material to the back ferrule in close contact with the tube adjacent to the tube grip. Having the additional material offers direct and axial support to the tube gripping function.
In addition, the two-ferrule mechanical grip design makes it less likely that fittings will loosen due to vibration while allowing a small amount of movement and maintaining grip integrity. The movement is called “spring back” and allows the tubing to withstand vibration stress. Finally, this design provides a highly reliable gas seal because the long lines of sealing contact between the ferrules and the tube strengthen it.
To install a two-ferrule mechanical grip fitting, there are three simple steps to follow:
- Insert the tubing into the tube fitting. Make sure the tubing rests firmly on the shoulder of the fitting body and that the nut is finger tight.
- Mark the nut of the fitting at the 6 o’clock position
- Hold the fitting body steady and tighten the nut one-and-a-quarter turns
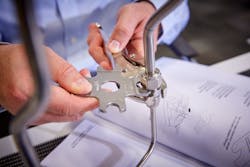
Once the fitting connection is assembled, it is critical for technicians to employ a gap inspection gauge to ensure the fitting is tightened well enough (Figure 2). To do so, they should place the gauge between the nut and body hexes of the fitting and gently push. The fitting is correctly tightened if the gauge does not fit in the gap; if there is enough space for the gauge to enter, then technicians should tighten the fitting further.
Avoiding Interchange and Intermix
Intermixing or interchanging components from different suppliers is not a best practice. Interchange occurs when an assembled tube fitting is removed and replaced with a tube fitting from another manufacturer. Intermixing means that tube fitting components like tubing, nuts, and ferrules come from different manufacturers and are assembled together to construct a completed fitting.
Avoiding both practices is essential to creating leak-free fluid systems because there are no common standards for the design of tube fittings, so there is no guarantee components from different manufacturers will properly work together. Using components from different manufacturers may also render your warranty invalid, which will lead to higher maintenance costs if something does indeed go wrong.
In conclusion
To reduce leaks and improve overall performance, plant operators should follow generally accepted best practices when it comes to installing tube fittings. Whenever possible, find a supplier who can support proper tube fitting installation through effective training for plant employees. Adhering to these standards will improve environmental safety, operational efficiency, and profitability because critical fluid systems will function as designed.


