Extracting the root of a puzzling gear tooth failure
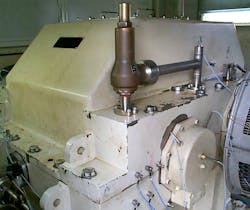
Figure 1. The serious malfunction, which consisted of broken pinion teeth in the gearbox, took the entire system out of service. The root cause of the failures was a mystery to both the unit’s owner and the gearbox OEM.
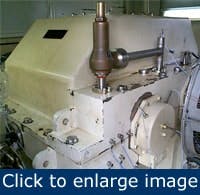
A 37-MW electrical power generation system driven by an aeroderivative gas turbine (Figure 1) suffered a puzzling failure in its parallel-shaft gearbox (Figure 2). After only several thousand hours of operation under typical service conditions, the teeth broke on the pinion of a double helical gear set (Figures 3 and 4).
The original equipment manufacturer (OEM) asked us to uncover the underlying cause of the failed gear teeth. Previous studies of this matter proposed gear mesh misalignment as the root cause of the failure. The basis for this conclusion was founded primarily on bluing patterns observed on the pinion’s turbine-end helix.
Because the gear tooth failures were attributed to misalignment, the OEM had begun to redesign the gear tooth profile on the replacement gear to better tolerate misalignment. Nonetheless, the OEM suspected that the gear mesh misalignment theory didn’t explain the gear tooth failures completely. At the time, however, a better explanation wasn’t apparent.
Figure 2. The drivetrain’s gearbox was instrumented with accelerometers, velocity transducers and proximity probes to record the response during the routine operating conditions.
Testing and analysis
We performed a comprehensive on-site evaluation of the drivetrain to capture data that potentially could suggest a better explanation for the failures. This mechanical testing included operating forced response and impact modal testing, vibration monitoring during partial and transient load events, and measuring critical dimensions in the gearbox and shaft position as load and temperature varied. Accelerometers, velocity transducers and a multi-channel data acquisition system captured structural and rotor vibration measurements. Radial proximity probes at each end of both gearbox shafts and an axial proximity probe measured movement of the input (pinion) shaft (Figure 2).
Figure 3. The gear tooth failures were severe enough that sizeable fragments of the pinion not only fractured, but had broken completely free from the gear during routine operating conditions.
An Essinger Bar system measured the movement of each gearbox bearing housing. Temperature mapping across the gearbox at each operating condition identified possible anomalies in the temperature distributions, which could have been related to distortion and gear misalignment.
The recorded test data showed that structural vibration occurring in the gearbox during different test load conditions was inconclusive. The motion of the gearbox bearing housings relative to the baseplate was inadequate to cause the misalignment that others suggested, again based on an interpretation of the bluing pattern.
Figure 4. Additional scratches in the gear teeth occurred as broken gear tooth fragments dispersed through the gearbox.
Moreover, gear analysis tools failed to predict magnitudes of mechanical stress that would have caused gear tooth failures at the location where they had occurred (apex edge of the double helix chevron, always on the same side of the apex), even when mesh misalignment was considered in the analysis.
On the other hand, we saw considerable pinion rotor radial and axial vibration, particularly when the gearbox was operated at low loads or at idle speed. Significant shifts in the pinion’s axial position and relatively high-amplitude axial vibration were apparent while the drivetrain operated at idle speed.
The axial vibration was intensified by the excitation of the pinion’s axial vibration frequency. The pinion’s radial vibration rose when the gearbox was operated at synchronous speed but under no load. The primary component of this vibration mode occurred at 43% of running speed, the result of bounded rotordynamic instability. These conditions could have contributed to gear tooth failures, but were insufficient to provide a complete explanation of the high stresses at the failure location.
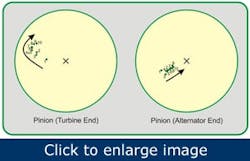
{pb}Measurements recorded at the gearbox bearings indicated that radial loading on the pinion rotor wasn’t balanced between the turbine end and the alternator end. The bearing temperatures and eccentricities at the rotor ends differed considerably, and the data indicated that radial loading was skewed to the turbine end. The measurements also showed that the gearbox leaned towards the alternator when under load. This was in conflict with the “axial centering” and side-to-side load sharing nature of a double helical gear. Interestingly, the average location of the pinion’s radial centerline shifted in an unexpected manner as the load increased (Figure 5).
Figure 5. The pinion shaft centerline position is depicted relative to the pinion bearing centerline, both at the turbine end (left) and at the alternator end (right). The two large circles represent bearing clearances, and the arrows indicate the directions the rotor centerline moved with increasing load during testing. The substantial difference in the responses at the two ends of the pinion also is evident.
As the load increased, movement in the turbine end followed a crescent-shaped trajectory, while the alternator end gradually moved toward the bearing centerline along a relatively straight path. In the absence of external forces, a double helical gear moves axially until the torque load is balanced between the helices. Gear symmetry results in identical radial loads, which the bearings on the turbine and generator end must carry. Symmetric loading implies both bearings should operate similarly, which was what drivetrain testing didn’t reveal.
The rotor centerline trajectories indicated that the radial load on the turbine-end bearing increased while the radial load on the alternator-end bearing decreased as the overall transmitted torque rose.
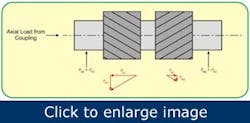
For this situation to exist, an external axial force must be acting on the pinion rotor to make one helix carry significantly more load than the other. A free body diagram of the helical gear set illustrates how helix loading can be asymmetric when an external axial force is applied to the pinion (Figure 6).
Figure 6. A free body diagram of the helical gear set illustrates the unbalanced forces on the pinion that arise when an external axial force is applied.
Diagnosis and solution
The source of the external force, and cause of the failures, was thermal growth in the high-speed rotor system (pinion and the power turbine). To be transmitted to the pinion, such an external axial force also had to have passed through the disk-pack type mechanical coupling connecting the turbine and gearbox.
[pullquote]In general, disk-pack couplings are flexible in the axial direction. However, test data showed that drivetrain axial thermal growth exceeded the maximum axial travel that this particular flexible coupling could tolerate.
The drivetrain’s axial growth pushed on the bull gear rotor thrust bearing, which then transmitted the unbalanced axial load to the gear teeth. The turbine-end helix carried significantly more load than did the alternator-end helix, and this load imbalance led to pinion geartooth failures well within the equipment’s expected operating life.
A modification of the coupling to include additional axial clearance corrected the machinery problem. The coupling then accommodated thermal growth between the power turbine and gearbox pinion at the operating conditions of the high-speed rotor system. Gear-mesh misalignment wasn’t the primary factor causing gear tooth failures, which suggested that gear tooth profile modifications the OEM was devising at a cost of $300,000 weren’t necessary, and might even be harmful.
The additional testing and analysis identified the root cause of the equipment malfunction, saved the OEM money and potentially prevented additional costly gearbox failures.
Eric Olson is a principal engineer and Chris Hurrell is manager of test facilities at Mechanical Solutions, Inc., Whippany, New Jersey. Contact them at [email protected] and (973) 326-9920.
