Types of elevators
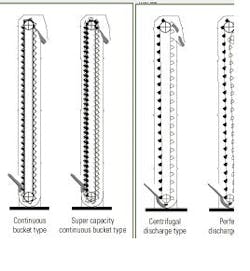
Centrifugal discharge elevators are the most frequently used type for free-flowing, fine or small lump material, such as grain, coal, sand, clay, sugar, cullet and dry chemicals. Buckets are "A" or "AA" malleable iron or steel and mounted at intervals on a belt or chain.
Figure 2. Buckets types. "A" (left) and "AA" (right)
They usually operate vertically but are sometimes inclined. Buckets are loaded by a combination of material flowing into buckets and by scooping from a boot, the lowest part of the elevator. Speeds are relatively high and governed by head wheel diameter and its relation to centrifugal discharge action.
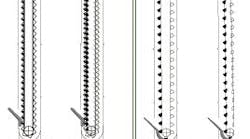
Figure 1. Four styles of bucket elevator
Perfect discharge elevators are similar to the centrifugal discharge type, except that buckets are snubbed back under head sprockets to gain a more complete discharge at a slower chain speed. The elevators usually handle light aerated, dusty and sticky materials that won't discharge cleanly from a centrifugal discharge elevator. The "A" or "AA" malleable iron or steel buckets are mounted at intervals on two strands of chain. Providing a capacity equal to the centrifugal discharge type requires larger buckets or closer spacing.
Continuous bucket elevators are recommended for large capacity heavy-duty service. The buckets are steel, mounted continuously on single or double strands of chain, or on a belt. The elevators can be either vertical or inclined. As the buckets pass over the head wheel, the flanged front of the preceding bucket acts as a chute to lower the material to the discharge spout. This discharge method, plus the slower speed, minimizes breakage of fragile materials. These elevators are not the self-digging type. As a result, they require a loading leg and a deeper pit than other elevator styles.
Super capacity continuous bucket elevators handle the same materials as the continuous bucket elevators in the larger capacities. They are used for run-of-mine or sized coal, stone, ore and the like. The steel buckets, mounted between strands of roller chain, operate slowly. The construction of the bucket provides a greater capacity than the standard continuous type, but with the same means of loading and discharging. The elevators are built in both vertical and inclined styles. The vertical model has steel guides and the inclined type has tracks. Inclined types can be either open or enclosed.
Operating speed
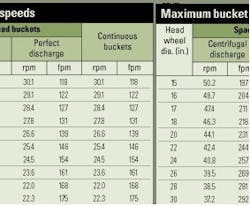
The elevator's capacity is a function of its speed. The maximum chain speed that still provides proper discharge varies according to elevator type and head sprocket diameter. Table 1 gives the recommended speeds for various combinations of type and head sprocket diameter.
- Recommended bucket speeds for vertical chain elevators are as follows:
- Centrifugal discharge elevators (190 to 275 fpm).
- Perfect discharge elevators (110 to 140 fpm).
- Continuous Bucket elevators (90 to 150 fpm).
- Super capacity continuous bucket elevators (60 to 110 fpm).
For easy pick-up in a digging boot, the foot wheel diameter should be three-fourths that of the centrifugal discharge head wheel. For grain and similar uniform, dry, granular, non-abrasive materials with bulk densities from 50 to 60 lb. per cu. ft., increase centrifugal discharge speeds by 15 or 20 percent. For light powdery material, decrease speeds by 10 to 15 percent. If buckets of centrifugal and continuous elevators are mounted on belts, speeds may be increased 20 percent.
Maintenance and troubleshooting
Efficient bucket elevator performance depends on a good preventive maintenance schedule. Start with a systematic visual inspection of the complete bucket elevator assembly and related components. Repair minor defects observed during operation as soon as current elevator operation has ceased. In the event of a major deficiency that could damage equipment seriously or injure operators, stop the operation immediately and make the repairs.
Proper maintenance includes cleanliness of the equipment and components, regular and periodic inspections, and immediate replacement of defective components and parts. Good housekeeping is critical to maintaining an efficient operation.
Look for signs of structural damage and cracked or broken welds. Pay particular attention to areas subjected to great stress. Repair or replace as necessary.
Inspect the elevator frame and supports for signs of looseness, excessive corrosion, rust and damage. Repair or replace as necessary. Scrape and paint as necessary.
Look for loose bolts, screws and nuts, and tighten as necessary. Replace missing or damaged components. Inspect tapped holes for thread damage. If they are cross-threaded or if spalling is evident, retap the hole to the next larger size. If retapping will weaken the part, or if part cost makes it uneconomical, replace the damaged part. At times, chasing threads with the proper size tap or die is adequate.
Inspect shaft bearings for excessive wear or damage and replace as necessary.
Chains
Before working on the chains or performing any maintenance on the bucket elevator, follow standard lock out/tag out procedures.
Remove the inspection doors on the lower casing and inspect the chains for stretch caused by normal wear of pins and bushings. Tighten or replace loose or missing bucket bolts. After tightening the bolt and nut properly, tack weld them tegether. Replace missing cotter pins immediately to prevent the chain link from separating.
Watch for excessive side sway, which indicates slack in the chain. Check at the foot of the elevator to ensure chains are not hanging below the foot sprockets. Slack chain below foot sprockets can swing into the casing and damage it or catch the buckets and pull them loose. Also, if the foot shaft has an extension for driving auxiliary equipment, it won't transmit power if the chain disengages. Remove slack by adjusting the take-up bearings on the foot shaft and adjust the take-up screws evenly on both sides. Don't pull the chains taut; the barrel of the link should fit the tooth contour of the sprockets without a snapping action.
It's reasonable to expect that chains and buckets will need replacement. When replacing the chain, carefully examine sprockets for wear. A new chain will not fit sprockets with a worn pitch and will wear much faster than one installed on new sprockets. Replacement chain is usually packaged in ten-foot lengths for ease of handling. It is replaced one bundle at a time through the access doors. For additional information about chain replacement, see the sidebar.
Motors and drives
Inspect the drive assembly for signs of damage and improper operation. Repair or replace as necessary. Inspect oil-tight chain guards for damage and leaks. Repair or replace as necessary. Add oil to proper level, if required.
Inspect the drive chain and sprockets for damage and excessive wear. Replace damaged or worn chain. When replacing the drive chain, replace sprockets also. This ensures longer life.
Check setscrews and keyways. Check the sag in the drive chain. It should always be kept snug, but not taut. Sag must never exceed two to three percent of the distance between drive sprocket centers.
Inspect the backstop for signs of damage and for improper operation. Repair or replace as necessary.
Check the reducer for unusual noises or excessive heat. Guidelines for time-based preventive maintenance on reducers include:
- Inspect for loose mounting bolts and signs of damage once a week.
- Check housing for corrosion monthly.
- Check horizontal shaft alignment monthly.
- Inspect for cracked, broken or excessively worn gear teeth. Check pinion alignment and tooth clearance semi-annually.
- Check reducers for proper oil level. Add oil as necessary.
Check the motor for unusual noises or excessive heat. Guidelines for time-based preventive maintenance on motors include:
- Inspect motor for loose mounting bolts. Check for signs of damage once a day.
- Inspect for worn or damaged shaft bearings monthly.
- Check to see that motor is properly ventilated. Remove obstructions that prevent proper motor ventilation once a day.
- Check for correct alignment of the motor and driven shafts monthly.
- With the motor running, check for vibration weekly. Shim as necessary.
- Lubricate as necessary.
Lubrication
Geography and operating conditions determine proper lubrication intervals. Inspect bearings for excessive wear or damage on a monthly basis and lubricate as required. Reducers are shipped without oil. Be sure they are filled with the proper oil to the correct level before equipment start-up.
Faulty lubrication can damage a drive chain more than years of normal service. Lubricate new chains with a lubricant having rust inhibiting properties. Make provisions for adequate, subsequent lubrication and for protection from dirt and moisture when chain drives are put into service.
Safety
Safety and maintenance accessibility are key features in the better chain and belt bucket elevators. Look for steel access ladders to the operating platforms. They should be constructed with heavy steel side rails punched for round rungs, which are welded in place. Ladders should be tied to elevator casings, or other structures, at approximately 10-ft. intervals. The safety cage should be of heavy steel bars with welded steel angle vertical members.
Platforms should surround at least three sides of the elevator head, with double angle or pipe railings, steel toe boards and bar grating or checker plate floors. The platforms can incorporate the drive motor supports.
The elevator head sprocket should be accessible through access doors strategically placed on the hood. It can be hinged to access the head shaft assembly. Guards should protect drive machinery from the elements and protect personnel.
Drive system options
The drive mechanism on bucket elevators can be one of several types. The first option consists of a gear motor or motor reducer mounted on a sliding base and having the output shaft connected to the head shaft by means of a roller chain running over cut-tooth sprockets and equipped with a steel, oil-tight chain guard.
A second option has a motor connected to reducer by a flexible coupling and is mounted on a common steel base. Drive from output shaft to head shaft is by means of steel roller chain running over cut-tooth sprockets and equipped with a steel oil-tight guard.
The third option consists of a shaft-mounted reducer driven by V-belts and motor.
Finally, either a gearmotor or motor and reducer can be mounted on a sliding base with final reduction by steel roller chain running over cut-tooth sprockets and equipped with a steel oil-tight chain guard. The head shaft has mounted screw take-ups.
Malia Garner is manager of the parts and service group of The Fairfield Engineering Co., Marion, Ohio. She can be reached at 740-387-3327 or at garnerm@fairfieldengineering.com.
Replacing chains
- Loosen take-up bearings to their minimum take-up position.
- Remove the buckets to lighten the chain being removed. To keep the chain balanced, remove every other bucket the first time around. The chain may be jogged by momentary contact of the starting switch. Use care when removing buckets. With the buckets completely removed from one side, the chain could move.
- Attach a block and tackle or chainfall to points on the chain approximately 12 ft. apart. Tighten until there is slack in the chain between the two points.
- Remove a section of the old chain the same length as the new one to be installed.
Install new length of chain. - Repeat steps 3 through 5 until new chain is installed.
- Adjust take-up bearings. The chain should not be pulled taut, but snug enough so the barrel of the link fits the tooth contour of the sprockets without a snapping action.
- Adjust the throat plate in the head section chute so it's no closer than 3/4 in. to the buckets.
- Install buckets in the same manner in which they were removed, using new bolts and nuts. After bolts and nuts have been properly tightened, tack weld nuts to the bolts to prevent them from working loose.
- After a new elevator chain has been in service approximately one week, or has handled 400 to 500 tons of material, adjust take-up bearings to remove initial stretch from the chain.


